Forest: Difference between revisions
DrewUniverse (talk | contribs) (Added Treasure Count template, updated comment tags.) |
Tag: Undo |
||
| (43 intermediate revisions by 9 users not shown) | |||
| Line 1: | Line 1: | ||
{{ | {{Infobox Location | ||
|Name=Forest | |||
|Image=Forest_Preview.webp | |||
|Shops=Item | |||
|Treasure=4 | |||
|Mobs=Random Encounters | |||
|Previous=[[Seles]] | |||
|Next=[[Hellena Prison]]}} | |||
{{Location | |||
|Synopsis=The '''Forest''' is a wooded area with assorted trees, shrubs, and worn paths. Its vegetation is scattered enough to allow sunlight to trickle through its canopies. It is one of the access ways between [[Seles]] and the rest of [[Serdio]]. The [[Prairie]] is located to its north. Woodland creatures inhabit the area including large beasts and small rodents that follow [[Dart]]. | |||
|Story1=On his mission to save [[Shana]], Dart must first travel through the Forest to reach [[Hellena Prison]]. After crossing a ravine via a fallen tree, Dart encounters a horned beast. He is able to scare it off with a wave of his arms. The ordeal causes Dart to recall years ago, when he and Shana were children, they were crossing the same log. They encountered a horned beast then as well, and a young Dart protected Shana by getting between the two of them and shouting at the creature to "leave Shana alone." In the present day, Dart repeats those words to himself, strengthening his resolve to rescue his childhood friend. | |||
|Story2=After Dart, [[Lavitz]], and Shana escape from Hellena Prison, the forest is occupied by an encampment of [[Sandora]] soldiers. Unable to pass as a result, they must take an alternative route back to toward [[Bale]] through the Prairie instead. By the time the party reaches Bale, the imperial army has moved on. It can be presumed that following the events of the party's second visit to Hellena Prison that they journey through the Forest once more to Seles, before venturing through one final time on their way to [[Kazas]]. | |||
= | |Services=The Merchant provides a tutorial for [[Items#Attack_Items|Attack Items]] and [[Elements]]. Once the party departs from Hellena Prison, the merchant in the Forest leaves making both his Item Shop and tutorial inaccessible. | ||
|Shops= | |||
== | {{{!}} class="wikitable mw-collapsible" style="display:inline;" | ||
!colspan="2" {{!}} Item Shop | |||
{{!}}- | |||
! Price !! Item | |||
{{!}}- | |||
{{!}} 10G {{!}}{{!}} [[Items#healingpotion|Healing Potion]] | |||
{{!}}- | |||
{{!}} 10G {{!}}{{!}} [[Items#bodypurifier|Body Purifier]] | |||
{{!}}- | |||
{{!}} 10G {{!}}{{!}} [[Items#burnout|Burn Out]] | |||
{{!}}- | |||
{{!}} 4G {{!}}{{!}} [[Items#charmpotion|Charm Potion]] | |||
{{!}}} | |||
|Treasure={{TreasureCount|4}} | |||
{{{!}} class="wikitable mw-collapsible" style{{=}}"width: 700px;" | |||
{{!}}- | |||
{{ | |||
{{ | |||
! Contents !! Acquisition !! Image | ! Contents !! Acquisition !! Image | ||
{{!}}- | |||
{{!}} [[Items#healingpotion|Healing Potion]] {{!}}{{!}} Turn around near the Merchant and follow the upper path back to the right.{{!}}{{!}}[[File:Forest_Chest01.webp|256px]] | |||
{{!}}- | |||
{{!}} [[Items#charmpotion|Charm Potion]] {{!}}{{!}} Against the background trees just past the first fallen tree acting as a bridge.{{!}}{{!}}[[File:Forest_Chest02.webp|256px]] | |||
{{!}}- | |||
{{!}} 20 Gold {{!}}{{!}} In the maze, on the right edge, take either of the two paths lower than the one Dart enters from.{{!}}{{!}}[[File:Forest_Chest03.webp|256px]] | |||
{{!}}- | |||
{{!}} [[Items#burnout|Burn Out]] {{!}}{{!}} In the maze, on the left edge, take the lower path. {{!}}{{!}}[[File:Forest_Chest04.webp|256px]] | |||
{{!}}} | |||
{ | |||
! | |||
|MinorEnemies= | |||
{| | {{Combat Preview | ||
| | |Name=[[Berserk Mouse]] | ||
|Image=Mob_Berserk_Mouse.webp | |||
| | |Element={{TElemDa}} | ||
| | |EXP=3 | ||
| | |Gold=3 | ||
| Assassin Cock || | |Drops=[[Items#healingpotion|Healing Potion]] | ||
| | |Chance=10%}} | ||
| | {{Combat Preview | ||
| | |Name=[[Assassin Cock]] | ||
| | |Image=Mob_Assassin_Cock.webp | ||
| | |Element={{TElemWi}} | ||
| | |EXP=5 | ||
| | |Gold=6 | ||
| | |Drops=[[Items#healingpotion|Healing Potion]] | ||
|} | |Chance=10%}} | ||
=== | {{Combat Preview | ||
|Name=[[Trent]] | |||
|Image=Mob_Trent.webp | |||
|Element={{TElemEa}} | |||
|EXP=4 | |||
|Gold=9 | |||
|Drops=[[Items#pellet|Pellet]] | |||
|Chance=10%}} | |||
{{Combat Preview | |||
|Name=[[Goblin]] | |||
|Image=Mob_Goblin.webp | |||
|Element={{TElemFi}} | |||
|EXP=4 | |||
|Gold=6 | |||
|Drops=[[Items#detonaterock|Detonate Rock]] | |||
|Chance=10%}} | |||
== | |Maps= | ||
# | {{{!}} class="wikitable mw-collapsible" | ||
{{!}}- | |||
! # !! Description !! Submap ID !! Image !! Encounter Formations (ID) !! Encounter% !! Escape% | |||
{{!}}- | |||
{{!}} 1 {{!}}{{!}} Path where a Merchant offers a tutorial on items. {{!}}{{!}} 624 {{!}}{{!}} [[File:Forest_Submap_01.webp|256px]] {{!}}{{!}} Berserk Mouse x2 (8)<br>Berserk Mouse, Assassin Cock (6)<br>Goblin, Assassin Cock (4)<br>Berserk Mouse (0) {{!}}{{!}} 35%<br>35%<br>20%<br>10% {{!}}{{!}} 90% | |||
{{!}}- | |||
{{!}} 2 {{!}}{{!}} Cliff with a Chest containing a Charm Potion. {{!}}{{!}} 5 {{!}}{{!}} [[File:Forest_Submap_02.webp|256px]] {{!}}{{!}} Assassin Cock x2 (7)<br>Trent, Assassin Cock (5)<br>Trent (2)<br>Assassin Cock (1) {{!}}{{!}} 35%<br>35%<br>20%<br>10% {{!}}{{!}} 90% | |||
{{!}}- | |||
{{!}} 3 {{!}}{{!}} Forest maze section with two Chests. {{!}}{{!}} 625 {{!}}{{!}} [[File:Forest_Submap03.webp|256px]] {{!}}{{!}} Goblin, Assassin Cock (4)<br>Trent, Assassin Cock (5)<br>Berserk Mouse, Assassin Cock (6)<br>Goblin (3) {{!}}{{!}} 35%<br>35%<br>20%<br>10% {{!}}{{!}} 90% | |||
{{!}}- | |||
{{!}} 4 {{!}}{{!}} Gorge where Dart reminisces about protecting Shana. {{!}}{{!}} 6 {{!}}{{!}} [[File:Forest_Submap04.webp|256px]] {{!}}{{!}} Assassin Cock x2 (7)<br>Berserk Mouse x2 (8)<br>Goblin, Trent (9)<br>Trent (2) {{!}}{{!}} 35%<br>35%<br>20%<br>10% {{!}}{{!}} 90% | |||
{{!}}- | |||
{{!}} 5 {{!}}{{!}} Final trail leading out of the Forest. {{!}}{{!}} 7 {{!}}{{!}} [[File:Forest_Submap05.webp|256px]] {{!}}{{!}} Goblin, Trent (9)<br>Berserk Mouse x2 (8)<br>Assassin Cock x2 (7)<br>Trent (2) {{!}}{{!}} 35%<br>35%<br>20%<br>10% {{!}}{{!}} 90% | |||
{{!}}} | |||
|Trivia= | |||
#The scene involving the Sandora army encampment blocking the Forest can be missed if the player goes directly to the Prairie. Upon concluding the events in Bale and leaving for [[Hoax]], the Forest is no longer blockaded allowing for travel back to Seles. | |||
[[Category: Locations]] [[Category: Disc 1]] [[Category:Missing Information]] | |References= | ||
}} | |||
[[Category:Locations]][[Category:Disc 1]] | |||
[[Category:Missing Information]] | |||
Revision as of 09:21, 6 January 2026
| Forest | |
 | |
| Services |
|
| Collectibles |
|
| Combat |
|
| Unique Locations |
|
The Forest is a wooded area with assorted trees, shrubs, and worn paths. Its vegetation is scattered enough to allow sunlight to trickle through its canopies. It is one of the access ways between Seles and the rest of Serdio. The Prairie is located to its north. Woodland creatures inhabit the area including large beasts and small rodents that follow Dart.
Story
On his mission to save Shana, Dart must first travel through the Forest to reach Hellena Prison. After crossing a ravine via a fallen tree, Dart encounters a horned beast. He is able to scare it off with a wave of his arms. The ordeal causes Dart to recall years ago, when he and Shana were children, they were crossing the same log. They encountered a horned beast then as well, and a young Dart protected Shana by getting between the two of them and shouting at the creature to "leave Shana alone." In the present day, Dart repeats those words to himself, strengthening his resolve to rescue his childhood friend.
Read More
After Dart, Lavitz, and Shana escape from Hellena Prison, the forest is occupied by an encampment of Sandora soldiers. Unable to pass as a result, they must take an alternative route back to toward Bale through the Prairie instead. By the time the party reaches Bale, the imperial army has moved on. It can be presumed that following the events of the party's second visit to Hellena Prison that they journey through the Forest once more to Seles, before venturing through one final time on their way to Kazas.
Collapse story content
Services
The Merchant provides a tutorial for Attack Items and Elements. Once the party departs from Hellena Prison, the merchant in the Forest leaves making both his Item Shop and tutorial inaccessible.
Save Points
None.
Rest Areas
None.
Shops
| Item Shop | |
|---|---|
| Price | Item |
| 10G | Healing Potion |
| 10G | Body Purifier |
| 10G | Burn Out |
| 4G | Charm Potion |
Collectibles
Goods
Main article: Goods
None.
Stardust
Main article: Stardust
None.
Treasure Chests
Main article: Treasure Chests
There are 4 treasure chests in this area.
| Contents | Acquisition | Image |
|---|---|---|
| Healing Potion | Turn around near the Merchant and follow the upper path back to the right. | 
|
| Charm Potion | Against the background trees just past the first fallen tree acting as a bridge. | 
|
| 20 Gold | In the maze, on the right edge, take either of the two paths lower than the one Dart enters from. | 
|
| Burn Out | In the maze, on the left edge, take the lower path. | 
|
Combat
Minor Enemies
Main article: Minor Enemies
| Berserk Mouse | ||
|---|---|---|
| ||
| Darkness | ||
| EXP 3 |
Gold 3 |
Drops Healing Potion 10% |
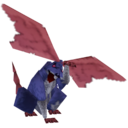
| Assassin Cock | ||
|---|---|---|
| ||
| Wind | ||
| EXP 5 |
Gold 6 |
Drops Healing Potion 10% |
| Trent | ||
|---|---|---|
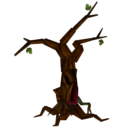
| ||
| Earth | ||
| EXP 4 |
Gold 9 |
Drops Pellet 10% |
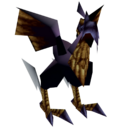
| Goblin | ||
|---|---|---|

| ||
| Fire | ||
| EXP 4 |
Gold 6 |
Drops Detonate Rock 10% |
Bosses
Main article: Bosses
None.
Maps
| # | Description | Submap ID | Image | Encounter Formations (ID) | Encounter% | Escape% |
|---|---|---|---|---|---|---|
| 1 | Path where a Merchant offers a tutorial on items. | 624 |  |
Berserk Mouse x2 (8) Berserk Mouse, Assassin Cock (6) Goblin, Assassin Cock (4) Berserk Mouse (0) |
35% 35% 20% 10% |
90% |
| 2 | Cliff with a Chest containing a Charm Potion. | 5 |  |
Assassin Cock x2 (7) Trent, Assassin Cock (5) Trent (2) Assassin Cock (1) |
35% 35% 20% 10% |
90% |
| 3 | Forest maze section with two Chests. | 625 |  |
Goblin, Assassin Cock (4) Trent, Assassin Cock (5) Berserk Mouse, Assassin Cock (6) Goblin (3) |
35% 35% 20% 10% |
90% |
| 4 | Gorge where Dart reminisces about protecting Shana. | 6 |  |
Assassin Cock x2 (7) Berserk Mouse x2 (8) Goblin, Trent (9) Trent (2) |
35% 35% 20% 10% |
90% |
| 5 | Final trail leading out of the Forest. | 7 |  |
Goblin, Trent (9) Berserk Mouse x2 (8) Assassin Cock x2 (7) Trent (2) |
35% 35% 20% 10% |
90% |
Trivia
- The scene involving the Sandora army encampment blocking the Forest can be missed if the player goes directly to the Prairie. Upon concluding the events in Bale and leaving for Hoax, the Forest is no longer blockaded allowing for travel back to Seles.
Gallery
None.